Time: at least 1 hour
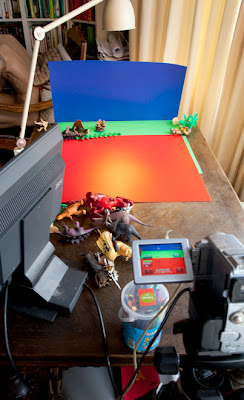 We get our animation resources together, cast the actors from a selection of toys (the fewer the better!). I set up a small background lit by an angle poised light. We then stuck down everything that shouldn’t move with blue tack. It’s a good idea to secure/fix everything that shouldn’t move in an appropriate way. Tuck away cables, use a sturdy table and tripod, staple backgrounds to supports etc. Because a child will always (ALWAYS) trip, drop, shake, fall, push etc causing havoc to the film.
(+ preparation time)
Equipment:
- digital video camera or stills camera
- animation software or video editing software
- tripod
- blue tack
- angle poised light
- toys and art materials
If you have never created a ‘stop frame animation’ you are in for a treat. It can be absolutely addictive for children and adults. I have experienced older children spending days creating animations (great for those long winter evenings). It does take a bit of preparation as you will need to source software and hardware and get it working together. If you own a Mac computer you will find the whole process a lot easier. If you are not sure what ‘stop frame animation’ is then read more here: http://en.wikipedia.org/wiki/Stop_motion
I use software called FrameThief and FrameSplicer (http://www.framethief.com/). It’s a great piece of shareware, easy to use and with loads of features. I have used it with children aged 4 and upwards. I use it with a basic Sony DV-camera attached to the computer via the firewire port. I won’t go in to detail about exactly how you create animations because there are masses of information available on the net (http://www.wikihow.com/Create-a-Stop-Motion-Animation).
How do animations work?
My 4 year old wanted to know how ‘Wallace and Gromit’ was made.
I set up a video camera and my animation software. In front of it I put some of his toys. I showed him quickly how I moved the toys a tiny bit at a time and recorded pictures of the toys. The great thing about animation software is that you can instantly replay what you have done so far. It’s hard work explaining to a 4 year old how animations work. Demonstrating the principle and then explaining is a lot easier!
I let my child have a go on his own. The animations at this stage weren’t very pretty – very jerky and without a story – but it kept him fascinated for a long time. “Why is it all just jumping about?” He asked after some experimentation. I explained that if he moved the toys less at a time it would look less ‘jumpy’. By experimenting he actually learned some fundamental animation techniques. I find that if give as little instructions as possible in the beginning and just let my child experiment, he tends to get much more hooked on a project. I then stand by with bits of advice as he asks for it.
Let us make a film
I want to make a film! Exclaimed my boy. He had grown tired of experimenting and now wanted to make his first ‘feature film’.
Storyboard
A great exercise with older children is to start by creating a storyboard (http://animation.about.com/od/recommendedreading/qt/storyboarding.htm).
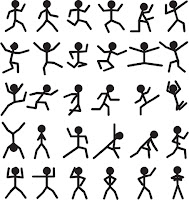 A storyboard can just be a series of stickmen and small explanations. The storyboard helps them realise what materials, backgrounds and characters they need to find/make/create before starting. It also ‘focuses’ the story: How does the story begin? What happens in the middle? How does it end?
 A storyboard can just be a series of stickmen and small explanations. The storyboard helps them realise what materials, backgrounds and characters they need to find/make/create before starting. It also ‘focuses’ the story: How does the story begin? What happens in the middle? How does it end?
With smaller children it’s easier to talk through the story. Let the child tell you his idea/story a couple of times and then tell it back to the child until you have ‘agreed’ on a reasonable outline. Making animations take a loooong time so ensure your first project is not too ambitious.
Our story
The initial idea for our story was ‘A BATTLE’. After questioning it turned out that the battle was between some dinosaurs and knights. “But why?” ask I “Do they want to fight?” As it turns out the knights where bad and had smashed the trees on the dinosaur island. We now had an outline for the story: Its morning and all dinosaurs meet up. Knights appear and chop down trees. The Dinosaurs get angry and a battle ensues. The Dinosaurs almost loose but a final twist to the film sees them beat the last knight.
Animating
 We get our animation resources together, cast the actors from a selection of toys (the fewer the better!). I set up a small background lit by an angle poised light. We then stuck down everything that shouldn’t move with blue tack. It’s a good idea to secure/fix everything that shouldn’t move in an appropriate way. Tuck away cables, use a sturdy table and tripod, staple backgrounds to supports etc. Because a child will always (ALWAYS) trip, drop, shake, fall, push etc causing havoc to the film.
We talk about the first scene (Its morning and all dinosaurs meet up). I suggest that we can show this by placing the dinosaurs at the edge of the scene and slowly move them to the centre. We divide the dinosaurs between us and each moves his lot. We take it in turns to capture images and animate. I try to keep the focus and divide the story into manageable chunks.
When creating stop frame animations there is plenty of time to talk but there is also plenty of time for a child to get bored. Switching roles and focusing on minor parts in the scene helps avoiding boredom and create excitement. My son is eager to get to the battle scene but by focusing on ‘making the dinos walk’ and continually playing the animation back to him, he gets excited by the scene in hand.
I have made a film!
Even a very short animation can take a long time to create. I find that the quality of the animation and the length is not so important the first time. The important thing is to create something the child will recognise as his film/story. “I have made a film!” is the success criteria that will spark of the wish to make another bigger and better film and a willingness to spend more time on the next project.
Enjoy
No comments:
Post a Comment